After lamp replacement
I know, I hinted at a video, but after careful deliberation, I decided lamp replacement was way too easy for my first video. There are many direct replacements available on Amazon, even if you don’t want to cough up the $40 for an OEM replacement.
Although the OEM light had quick-disconnect spade terminals, price and availability pushed me toward a lamp with wire leads. Given the recent shifts in our trading policies, cost and availability might become major headaches when trying to get replacement parts—assuming they’re even available. Wire leads might end up being the least of our problems.
I could make a video on soldering the wires, but let’s be real—there are already hundreds of those on YouTube. Still, there are a lot of other solutions that don’t involve soldering, making this the perfect excuse to dive into those instead.
Of course, after reading way too many product reviews from people seemingly determined to showcase their total incompetence, I know better than to assume this is foolproof. As simple as this seems to me, doing it wrong can injure you, kill you, and/or destroy your appliance. I know none of my regular readers would have these problems, but there’s always that one stray reader using Bing.
Given these concerns, the best I can do is lay out the options and tell you exactly what I did.
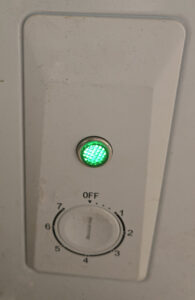
The Frigidaire Freezer Indicator Light, part number 5304495394, is a 1/2” diameter snap-in light, 120V, and green in color. Electrical connection is made through two spade terminals on the back. A quick Amazon search brought up three possibilities:
https://www.amazon.com/dp/B07DM7NJS3/ – The biggest difference is the metal ring around the face, and the lens sticks out about 0.25 inches farther than the OEM light. The ridiculous shipping charge and two-week delivery time immediately disqualified this option.
https://www.amazon.com/dp/B00UM7LPVE/ – Again, the metal ring around the face and a slightly longer lens. But having a delivery charge higher than the cost of the light itself? Hard pass.
Honestly, either of the above choices would probably work just fine, with only minor cosmetic differences. But what I actually ordered was this one. No extra shipping charges and two-day delivery. However, rather than spade terminals, it has wires.
Connection Options
Options Are as Follows:
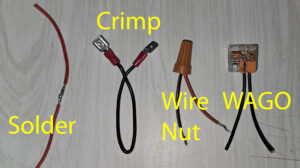
- Soldering the appropriate wires together
- Crimping a male spade connector to each lamp wire
- Twisting the wires together with a wire nut
- Using a WAGO 221-413 wire connector
First Things First: Unplug the Appliance
This doesn’t mean just flipping the switch. Physically unplug it. I used to work on live circuits, but I don’t do it nearly as often anymore. At a time when I had no other options, I asked my wife to stand by with a broomstick—just in case I grabbed the wrong wires—she got a little too excited and started taking practice swings. Talk about high-stress situations.
 With the appliance safely unplugged, you can move on to removing the old lamp. It snaps out, but the plate it’s mounted on seemed flimsy, so I played it safe and removed the plate first. A careful pry on the right side with a screwdriver did the trick. Once that side popped free, sliding it slightly to the right let me pull it out just enough to remove the light. Do not try to pop out the left side first. It’s secured by the right side and will not come out until the right side is moved.
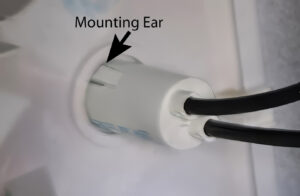
The light is secured in the panel by two small ears. Using a screwdriver to push in either of the ears will allow you to wiggle the light out from the back.
Important: Don’t Mix Up the Wires
Here’s where things get tricky. There are two wires going into each of the freezer-side spade terminals. If you switch them up, you’ll almost certainly blow a fuse—or worse. This is why I keep saying: Do this one terminal at a time. And for the love of all things electrical, take pictures before you start.
 Method 1: Soldering
Soldering is my go-to solution—strong, permanent, and easy (if you know how to do it). But you must properly insulate the joints with electrical tape or heat shrink tubing—because at 120 volts, exposed connections are a no-go.
The process is simple:
- Cut the spade connector off the freezer side.
- Strip the insulation off the three wires.
- Twist the wires together.
- Solder them securely.
Repeat this process twice—once for each spade connector. And remember, one connector at a time to avoid getting the wires crossed.
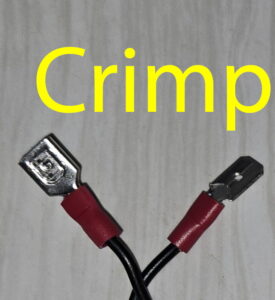 Method 2: Crimping
Crimping a male spade connector onto the lamp wires is easier than soldering and keeps the freezer in factory condition. But don’t just grab any old crimper—use a good one and always test each crimp.
I’ve crimped hundreds of connections and still had my fair share of failures—too much pressure, not enough pressure, using the wrong tool—you name it. Always give the wire a gentle tug after crimping to make sure it’s solid.
If you’re using uninsulated spades, don’t forget to cover them with electrical tape or heat shrink—or just buy these insulated terminals.
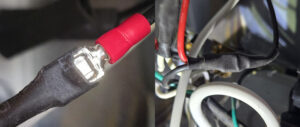
My solution – note the heat shrink in the left panel
 Method 3: Wire Nuts
Wire nuts are cheap, quick, and easy—but you need the right size, and you have to make sure all three wires are properly held.
- Cut off the spade connectors.
- Strip ¾ inch of insulation off both freezer wires and one lamp wire.
- Loosely twist all three together.
- Twist on the wire nut until everything is secure and no bare wire is showing.
Repeat for the second connection, and you’re done.
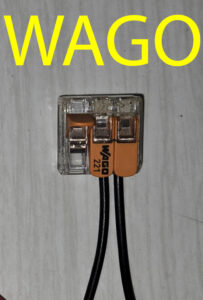 Method 4: WAGO Connectors
These things are fantastic—small, reliable, and ridiculously easy to use.
- Open all three levers on the WAGO 221-413 connector.
- Cut one spade connector off and strip the wires.
- Insert one wire into a hole and snap the lever down.
- Insert the second wire into another hole and snap the lever down.
- Strip the lamp wire, insert it in the last hole, and snap the lever down.
Repeat for the second connection. Done. As always, a gentle tug on the wires is your insurance against failure.
Conclusion: More Than Just a Lightbulb
I know—this seems like a lot of effort just to swap out a tiny light. But these same techniques apply to lamps, switches, and even motors in other appliances.
As the saying goes: Give a man a fish… or teach him how to fix his own appliances.
Just a thought. We all may need this skill soon enough.
© 2025, Byron Seastrunk. All rights reserved.